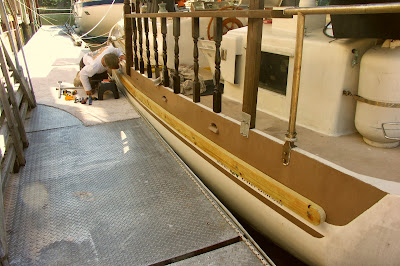
Port side rub rail up and Carter is beginning work on the stanchions.
The stanchions sit slightly recessed into the top of the rub rail so this picture shows Carter chiseling the spot. There are 8 stanchions on each side.
This picture shows the necessity for the rub rail. They will significantly reduce the paint scraping on the freeboard of the boat and protect the scuppers on the gunwale. We have lost a lot of them from brushing against docks but it was sort of pointless to replace them since they where so vulnerable without the rub rail to protect them.
Getting these installed were not so easy at all. Since the rub rail is fastened every two feet with a 3/8" bolt thru the hull, we pretty much had to clean out every cabinet, locker, and cubby along the entire boat. I've seen other boaters talk about the aerobics necessary to work on the small spaces on a boat and here's a picture showing one of the difficult positions necessary to accomplish the task.
This is in the galley directly behind the refrigerator. It's a fairly large storage space that normally houses a variety of coffee carafes, my electric mixer, toaster oven, toaster and the storage drawers where we keep our bread, trail mix, etc. Since the holes where the rub rail is secured to the boat had to be exposed inside the entire boat, this was a good opportunity to do some reprioritizing of our storage on the boat or not and then to clean and better organize what we decided to keep on board. It was a good exercise for both of us. But what a MESS!
I kept busy working on sewing new covers for the salon cushions for the past month and have finally completed them! Just like Carter did with the rub rail, I had put this task off for quite a long time. I ordered the material about a year ago! I'm a fairly good seamstress but this project scared me for some reason. Once I got into it, it turned out to be a pretty easy project.
I used the original cushions from the dinette set and added the extra foam I salvaged from the bed we removed and then added some additional cushion to one settee. So the backs stayed the original 4". One bottom measures 6" and the second bottom cushion measures a whopping 10". This evens the two seating areas to the same height so they will also make a good bed. It was a bit** getting all 10" into the cover and all I can say is...it's not coming back out again! LOL
Carter and I both are very pleased with how the salon is shaping up. There is still a little more detailing to be done on the settees and then we will paint the final product.
I even had enough material to make a seat cover for Carter's chair. The 2nd chair you see will be removed at some point in the future to make room for an additional hanging locker we so desperately need. Several friends and family have asked to see more pictures of the inside so very soon I intend to film a virtual tour.
 We had to go back to Tennessee to take care of some unexpected business before departing for the Keys. It was nice to leave the inch of snow behind when we headed South.
It was nice to see and feel the warm sunset when we returned.


I like the solar panel coffee table! Cushions look great.
ReplyDelete